Hi everybody,
I'm a new member of the Pi-Hole gang and it me some time to actually get Pi-Hole running on my network since I'm using this crappy Telekom Speedport router which doesn't allow you to really do anything.
Please be aware that the Speedport is not FULLY supporting the Pi Hole scenario. See my remarks below!
On top of that, I'm using a TP-Link router which is connected to the Speedport as an WiFi AP but this will not be covered here. If you want to know how this works, let me know.
This tutorial is valid for everyone who is looking for the following scenario:
- Using Pi Hole as an ad-blocker and using a Telekom Speedport as a router and modem.
My hardware:
- Raspberry Pi Zero WH with an USB OTG adapter to connect via Ethernet
- Telekom Speedport W724V Type A
The connectivity is very simple:
Public Internet --> Speedport W724V --> WiFi, LAN devices & Pi Hole
The Raspberry Pi Zero is connected to the USB and Ethernet ports of the Speedport. This allows the best Ping times and you don't need an extra power supply.
Pi Hole Installation
-
Set up the Raspberry Pi Zero W or WH by using this tutorial for example: Headless Raspberry Pi Zero W Setup. Make sure that you have SSH access to the Pi.
-
Install Pi Hole on the router by using any tutorial out there. For example: Block ads at home using Pi-hole and a Raspberry Pi
-
While running through the set-up, you are asked if you want to keep the IP of the RPi the same. Make sure you set up this IP as you wish and note it down. You will need the IP all the time from now on!
-
Once the Pi Hole installation is finished, let the Pi Hole reboot and you should be able to access the webinterface at http:///admin (replace with your Pi Hole's IP -> e.g. http://192.168.178.1/admin).
Speedport & Pi Hole Configuration
We now have to turn off the DHCP of the Speedport router and set up the Custom DNS. We also have to activate IPv6 ULA to successfully block ads in IPv6 scenarios. You will need your Telekom credentials (Zugangsdaten) for this!
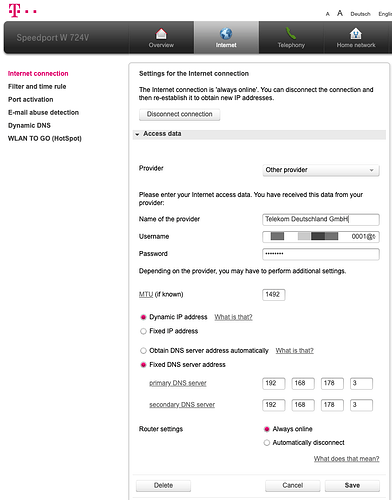
- Open the Speedport configuration page (usually http://speedport.ip/) and go to Internet -> Access data. Select the Other provider option and enter the following information:
Name of the provider: Telekom Deutschland GmbH
Username: Here you will have to enter a string matching this pattern:
Anschlusskennung+T-Online Nummer+0001@t-online.de -> e.g. 002342342300550234323430001@t-online.de
Password: Enter the "Persönliches Kennwort" here.
Dynamic IP address: yes
Fixed DNS server address: Enter the IP of the Pi Hole in here for two times.
See the screenshot below for reference:
Save and let the router reconnect to the Internet. This will happen automatically.
-
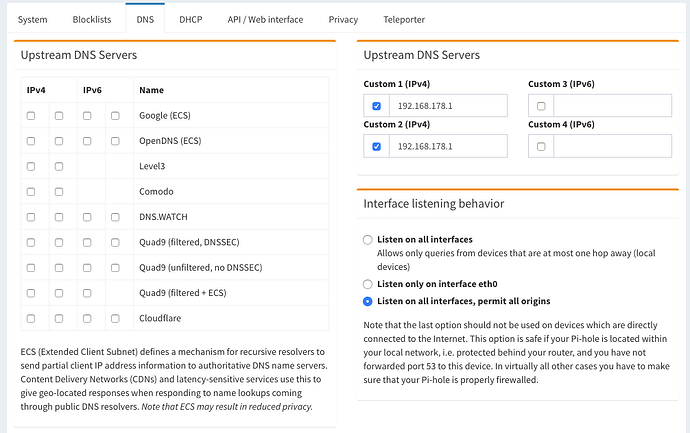
Open a new tab, log into the Admin console of Pi Hole and go to Settings on the left. Go to DNS and unmark all DNS servers on the left. Enter the IP of your router into both IPv4 fields. See screenshot below:
Then click on Save. -
Go to the DHCP tab. Activate DHCP and define your desired DHCP range. Make sure to active the IPv6 support as well. See screenshot below for reference.
Then click on Save. -
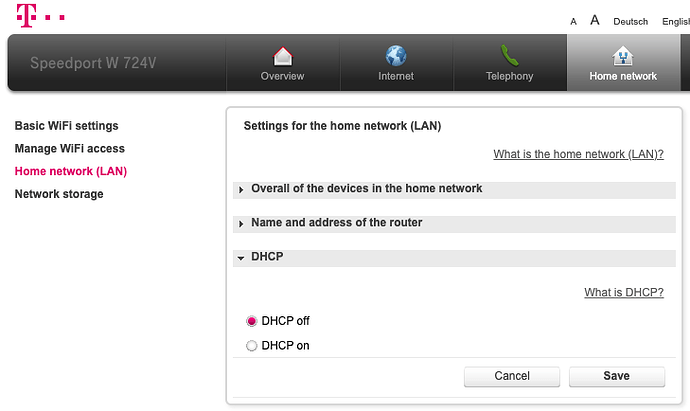
Go back to the tab where your Speedport Configuration page is opened and go to Home Network -> Home Network (LAN) -> DHCP. Turn the DHCP off.
Then click on Save. -
Stay on the same page and open the Name and address of the router tab. Activate the setting Use local IPv6 address (ULA). Also copy the Local IPv6 address (the one in the red frame) into a text document as you will need later.
Then click on Save. The router will now reboot which will take some time. Use the time to reboot the Pi Zero W as well!
We will now have to change the IPv6 address of the Pi Hole before we can proceed. Unfortunately, this can be only done via CLI.
- Once the router and Raspberry Pi are back, you should now get your DHCP IP from Pi Hole and not the router anymore. Open any SSH tool and connect to the Pi Hole. Run the following command:
ip -6 address | grep 'global'
This should return two addresses:
Copy the address which starts with the fd01 prefix (the same prefix like the ULA address from step 9). In the screenshot it's the first address. Don't copy the "/64" as we don't need it.
- Now open nano by using the following command:
sudo nano /etc/pihole/setupVars.conf
Go to the line which looks like this
IPV6_ADDRESS=A:B:C
Remove the existing IPV6 and paste the IPv6 address you just extracted in step 10. Press Ctrl + X on your keyboard and then confirm by pressing Y and ENTER on your keyboard.
Then reboot the Pi Hole by entering:
sudo reboot
- Once the Pi Hole is back, go to the Web Interface of the Pi Hole. Open the Settings tab and check if your new IPv6 address is shown in the Overview.
-
Go to the DNS tab and paste the IPv6 ULA address which you got in step 9 (!) into the fields Custom 3 (IPv6) and Custom 4 (IPv6). Make sure that there are no spaces in the IPv6 address, otherwise you get errors.
-
Now reboot the Pi Hole one last time and voilà - your Pi Hole is your new DHCP and advertises itself as DNS to your devices.
Remarks / Known Issues:
- Unfortunately, the Speedport is just a crappy device and won't let you turn off the IPv6 DHCP. This may lead to the problem that your devices get three DNS servers when connecting to the WiFi. Unfortunately, you can't avoid this but in my case, ads are usually blocked.
Have fun and let me know if the tutorial worked for you!


