Hello,
Just sharing this, maybe people find it useful, in which case I can elaborate or turn it into a proper howto. Basically the idea is to lift part of the complexities involved from the NAS to the router, so this strategy requires a decent router/firewall (I use a cheap Ubiquiti Edgerouter X, but DD-WRT and the like, or pfSense and other *nix/BSD boxes, or enterprise grade routers will obviously do the trick as well).
I recently installed pi-hole on my Synology DS916+ in an alternative manner. Although the Synology howto will probably work out great, I don’t like the amount of changes it made to the base Synology install and I am quite fond of isolating stuff in docker containers.
There is a great docker image for pi-hole, thanks to @diginc.
Some challenges to overcome:
- If running in a default bridged docker container, all network traffic is masqueraded, so the dashboard wont show which host made which request
- Synology’s DSM really loves port 80, even more with webstation installed - and my goal was to keep the NAS as close to baseline as possible
- Blocked https traffic requires a custom firewall rule to prevent long time outs, which I also didn’t want to do on the NAS itself as pi hole will run in a container
So the solutions are:
Edit: the latest dinc/pi-hole image has build in functionality to run the http deamon on a non-standard port, simplifying affairs a lot.
-
To make sure that the client stats have the actual client’s IP address: run the docker container with “host network” network enabled (this will remove the ability to remap ports, but see #2 how to deal with that)
-
To remap the http port, the nginx.conf needs to be changed. I did it by mapping the file from outside the container, and changing the listening port from 80 to something else (37337).
The http port is remapped via the WEB_PORT envvar.
By giving pi hole an IP address on a different (non-existing) subnet via the ServerIP envvar (this means pi-hole will hand out that IP address for hosts that should be blocked) we enable the router to apply DNAT to rewrite traffic destined for the non-existing ip address at port 80 to the actual Synology host at port 37337 (if the Synology is on the same subnet, you probably also want SNAT I learned BTW).
Last step is to modify nginx’s config server_name directive to tell it its actual IP, else some security check will kick in
We need one extra envvar, to allow the admin interface to be contacted on an address that differs from the pi-hole address (as we just configured pi-hole to use a non-existent address). For this the VIRTUAL_SERVER envvar is used. -
Is easy, now that we have the pi hole on its own non-existing subnet from the routers point of view, an empty firewall chain with a default of reject is sufficient.
Hope this might actually help somebody one day.
Thanks for the great stuff that is pi hole (and for the great docker image of it).
Edit: it seems wiki and posts are interchangeable on this board, I will start typing a guide piece by piece below in this post.
0. Prerequisites
- The method described in this guide will only work if you have a router/gateway on which you can configure IP tables or equivalent. Consumer routers running stock firmware will not work. Consumer routers running DD WRT or other open firmware will do for this guide, as will Ubiquiti, Mikrotik and other advanced routers. The router part of this guide will initially be based on Ubiquiti’s Edgerouter X.
- This guide is based on a Synology DS916+ running the latest firmware at the time of writing (DSM 6.1.4-15217 Update 1).
- It is assumed you have some basic command line skills when following this guide (ssh into your Synology, editing a file with nano or vi and adding iptable commands to your router if applicable).
- One needs the knowledge to apply firewall/NAT rules on the router. As it is very make/model specific this guide cannot cover all possible ways of applying the necessary configuration. (An attempt will be made to provide the required iptable commands though, as that is probably most commonly used).
The following network configuration is used, but this can obviously be changed to match any other network scheme:
The subnet pi-hole will serve is 192.168.178.0/24. All clients connect to this subnet.
The router/gateway can be reached on 192.168.178.1.
The Synology has 192.168.178.50 as address on the subnet.
The subnet 192.168.0.0/24 is not in use elsewhere on the network.
192.168.0.2 will be used as the IP address pi-hole is handing out for blocked domains.
TCP port 37337 is used as pi-hole’s http listening port.
1. Installing the docker image
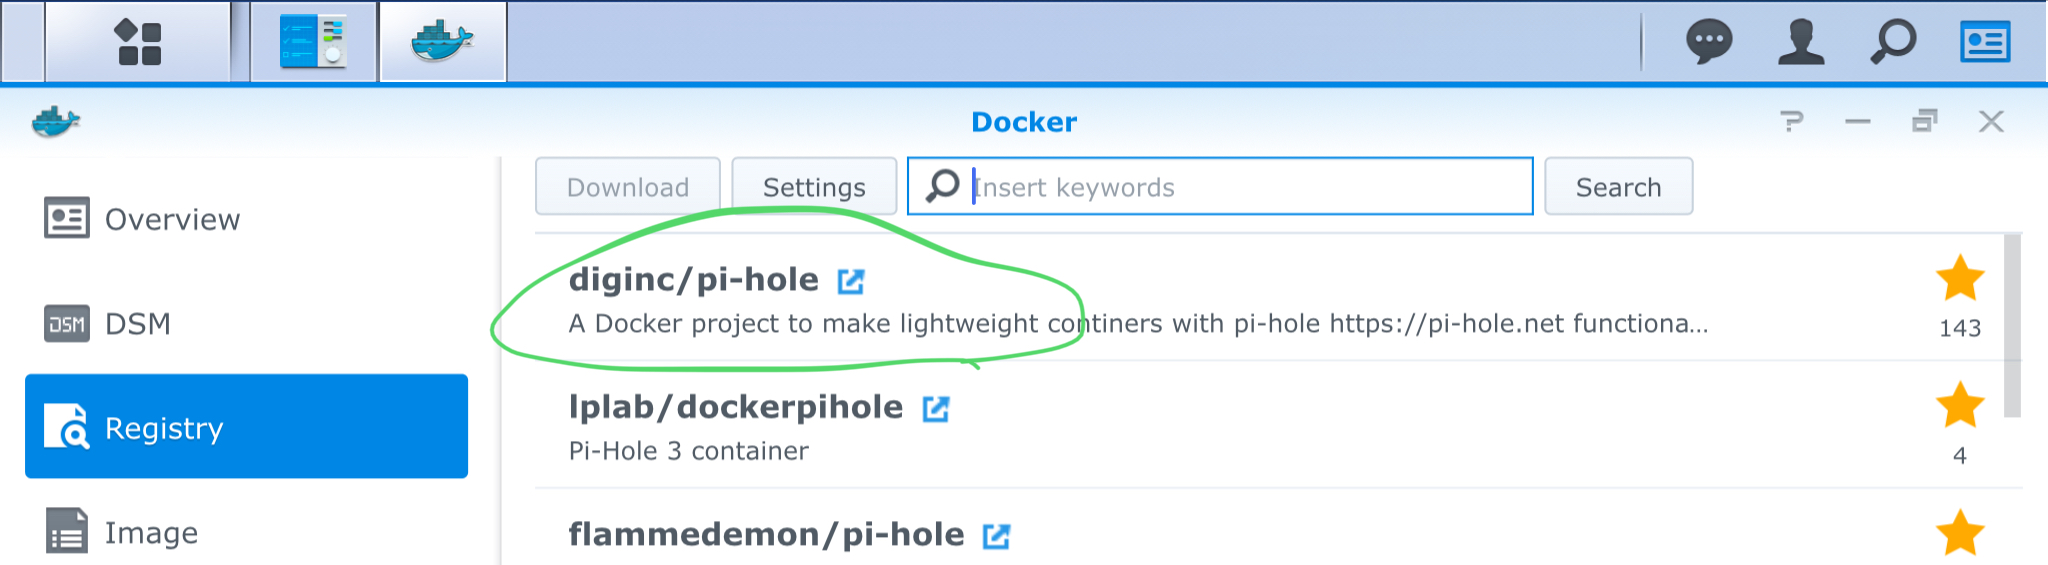
- In the Synology web interface navigate to the Docker “app”. In there search for “hole” in the registry. Select @diginc’s pi-hole image and download it:
- Be sure to read the info page and keep it at hand - in order to not duplicate data that will become outdated this guide will only list deviations from the default installation as per the info page.
2. Configuring the docker container
- Select the image and start creating a container from it (using the mis-named launch button).
- Enter the “Advanced Settings” menu of the wizard.
- In the advanced settings tab enable auto-restart
- In the Volume tab map the two directories as per the image info page.
- In the network tab enable “Use the same network as the Docker host”
- In the environment tab fill in the environment variables as per the image info page, with the following exceptions:
- set “ServerIP” to “192.168.0.2” (or whatever fake address you chose)
- set “VIRTUAL_SERVER” to “192.168.178.50” (or whatever IP address the Synology has)
- Set “WEB_PORT” to “37337” (or whatever port you want to assign to pi-hole’s http server)
At this point the container can be started, and the administration interface should be available on http://192.168.178.50:37337/admin/ (or whatever IP the Synology has and whatever port you chose previously).
Do not use it for DNS just yet, as any request to a blocked domain will result in a slow timeout.
3. Router firewall and NAT configuration
In case you want to get more information (on how to do this on a specific router): In general what we are establishing here is refered to as loopback NAT or hairpin NAT or NAT reflection, so search for those terms.
- Create a DNAT rule such that TCP traffic destined for 192.168.0.2:80 gets translated to 192.168.178.50:37337.

- Create an SNAT rule (or masquerading) from your router to the Synology for port 37337 (we need to force return traffic through the router, else the above DNAT rule won’t work). So translate source to 192.168.178.1 if destination is 192.168.178.50:37337.

For DD WRT I am not sure on what can be accomplished in the GUI. Probably you want to use iptable commands anyway. See this example on the necessary iptable commands (do not blindly type in every rule stated there, the first couple of rules are to enable outside internet access, which definitively should not be done in this case - and on DD WRT the lan device is probably br0).
- Create a firewall rule to REJECT all traffic from 192.168.178.0/24 to 192.168.0.0/24 (make sure to use REJECT, not DROP, to prevent long https timeouts). Note that DNAT will happen before any firewall rule is applied, so we can safely REJECT all and still reach the pi-hole.

Finally set 192.168.178.50 (or whatever address the Synology has) as DNS server in your DHCP server of choice.
Summary
Create a docker container from the diginc/pi-hole image
Configure it with host networking and some additional environment variables (given the network layout used as example above):
set “ServerIP” to “192.168.0.2”
set “VIRTUAL_SERVER” to “192.168.178.50”
Set “WEB_PORT” to “37337”
On your router configure:
DNAT from 192.168.0.2:80 to 192.168.178.50:37337
SNAT from 192.168.178.0/24 to 192.168.178.1 for traffic destined to 192.168.178.50:37337
Reject packets for 192.168.0.2
Start the container.
Set the clients to use 192.168.178.50 as DNS server.
Enjoy a safer and ad free internet!
 I use an Edgerouter-X. It is Vayatta (Debian Linux) based. But as you said, it probably wont be possible on a consumer router with stock firmware. DD-WRT is obviously a good choice in that case (although I am hard pressed to recommend DD-WRT on an internet facing router due to the lack of updates on older hardware).
 . Probably the 3 required iptable commands and where to put them would suffice. Or a screenshot if it can be done via the GUI.
